Outline Your Novel With A Mind-Map
Mixing the Analytical and Creative Sides of Your Mind

I previously wrote a piece regarding my outline process. In this article I thought I would go more in-depth on how I structure my outline. Again, there is no right or wrong way to write. I am the type of writer who likes to know everything before diving in, preventing any surprises midway through the story.
When I first learned about screenwriting, I bought Blake Synder’s book, “Save The Cat!” For years I felt like I had this secret insight into the formula of books and movies. I had consumed enough of each, I knew when to expect certain reveals, character introductions and false victories. Yet, when I read Save the Cat, I realized this “secret insight” was only me identifying the tried-and-true structure of storytelling. I was not aware of the defined sections of a story. I have been writing for what feels like three-fourths of my life, and I knew I had to do this, or do that when telling a story, but I never really understood why.
In the past, I would write my story and not realize a section dragged on, or a character reveal happened too late. I was merely telling my story and how I expected to see it on the big screen. After reading Save the Cat, I realized that readers (or audiences) have expectations for how a story flows. You are thinking to yourself, “I want to be different. Why would I fall in line and write the same thing as everyone else?” I know this, because I thought the same thing!
The phrase, “Every story has already been told,” is absolutely true. I had to accept that and understand what the real challenge was, “How do I tell the story differently?” This is the execution of storytelling. This is exactly why I created a process for my writing. I wanted to refine and perfect the execution of my storytelling.
Create Your Outline Structure
In my previous article, I wrote about the tools I use when I outline. During the initial 30th Floor outline, I prefer to use a mind-mapping app. There are two I frequently use, MindNode and Freeform. In this article I am going to focus on Freeform (Apple’s free version of a mind-mapping app). I am transitioning to this app, mostly because I feel like I am slowly drowning in an overwhelming sea of subscriptions.
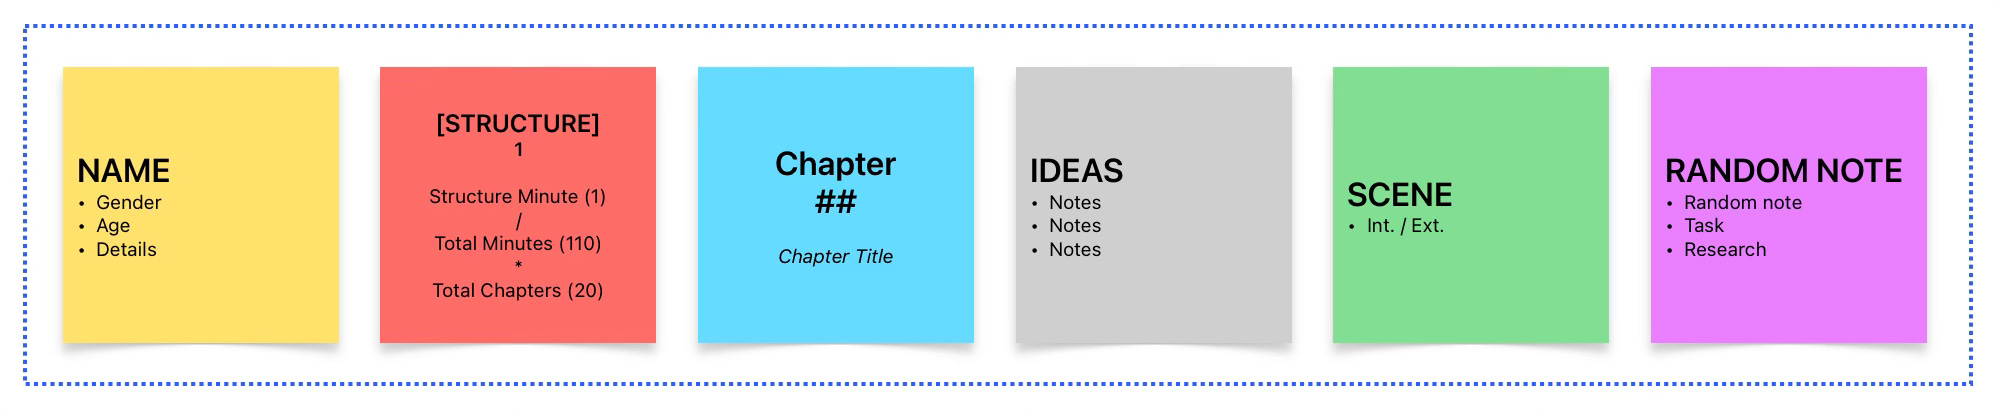
If you have ever used Post-It notes or index cards to arrange your story, this app will feel natural to you. I use the sticky note option in Freeform. The canvas is unlimited and you can drop in as many notes as you desire. In each mind-map outline, I prefer to color code my sticky notes:
Yellow: Characters
Red: Defined Structure Elements
Blue: Chapters
Gray: Ideas
Green: Scenes
Purple: Random Notes
First Step: The Ending
I need an ending before I start. I either pull from my bucket of ideas (I use Notion to save all my random ideas), or I start a fresh mind-map with a new ending idea. This begins with a gray sticky note on the completely blank canvas of Freeform. With that first gray sticky note, I write my idea. I add a second gray sticky note and elaborate more on the ending.
Once I feel that I have given enough definition to the ending, I work backwards. I ask myself, how did my characters end up here? This is the point where I drop a vast amount of gray sticky notes onto the board. No idea is bad in the beginning. With enough ideas on the board, I get a feel for where I need my opening scene.
Second Step: The Beginning
When I am ready to add the sticky note for my opening scene, I have run the scene through my head a dozen times. I need to ask myself what would be an opening scene that would capture my attention. What am I going to read that will make me want to go to work and tell my friend about this book? If this idea gives me that sense, I know I have a solid foundation between the opening and the final images.
It’s time for some fun. Much like how I expanded on the ending, I do the same for the opening scene. This will feel as though I am outlining the first chapter. I need to accomplish three things in this step:
Hook the reader
Drop a few crumbs to let reader know exactly what type of book they are about to read, and
Begin the set-up (introducing the main characters).
Hello Organization
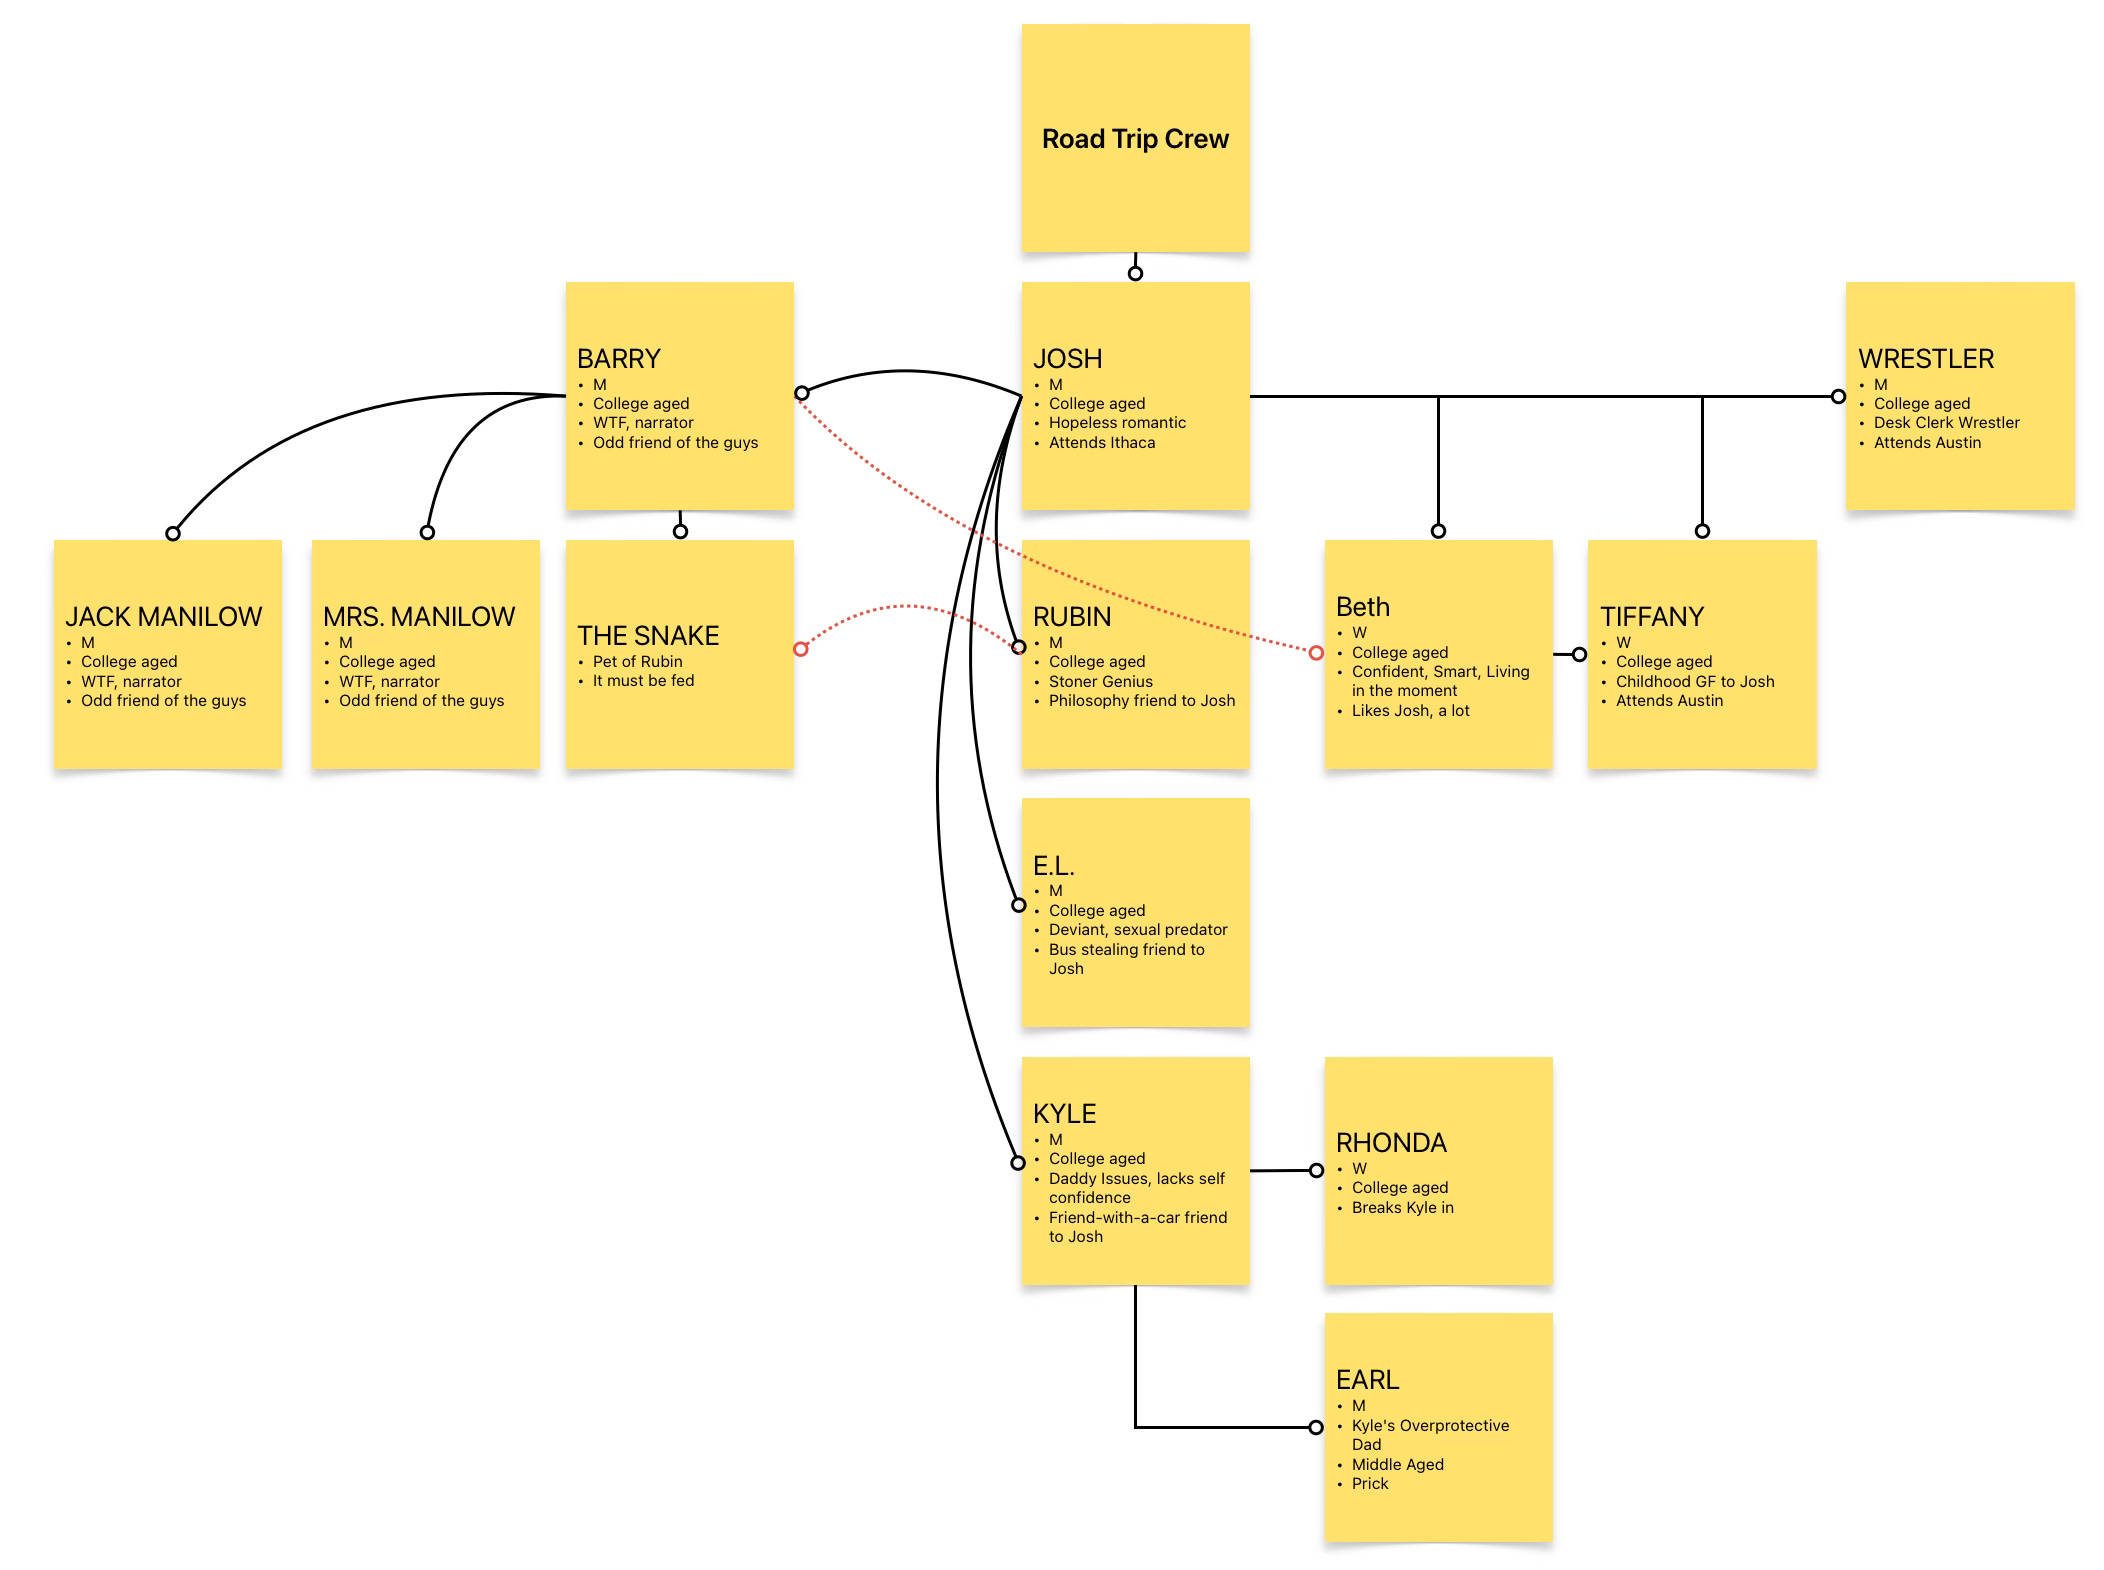
Great! We have our beginning and ending. The two most critical parts of our story. Now it is time to organize, and I start with the yellow sticky notes; the character notes. I place my first character sticky note off to the side. I add the main character’s name at the top, and below that I add a bulleted list for necessary and random information. This initial part is simple - we already know of at least one character with our beginning and ending in place. I will add a sticky note for each character involved in those two sequences.
But I don’t have names? That doesn’t matter, neither do I. You can keep it as simple as you wish. I will use “MC” as the temporary name, and below that I will list a gender as one bullet point, an age range in the next, and a couple more bullets for my wishlist or relevant information. If you’re anything like me, you’ll have a variety of names initially. For this, I created a second yellow sticky note, and add an arrow or connection line to the main sticky note for the character. I will list each of the names I am debating on name my character on this secondary note. Throw as much information on this canvas as you wish. In fact, I recommend it!
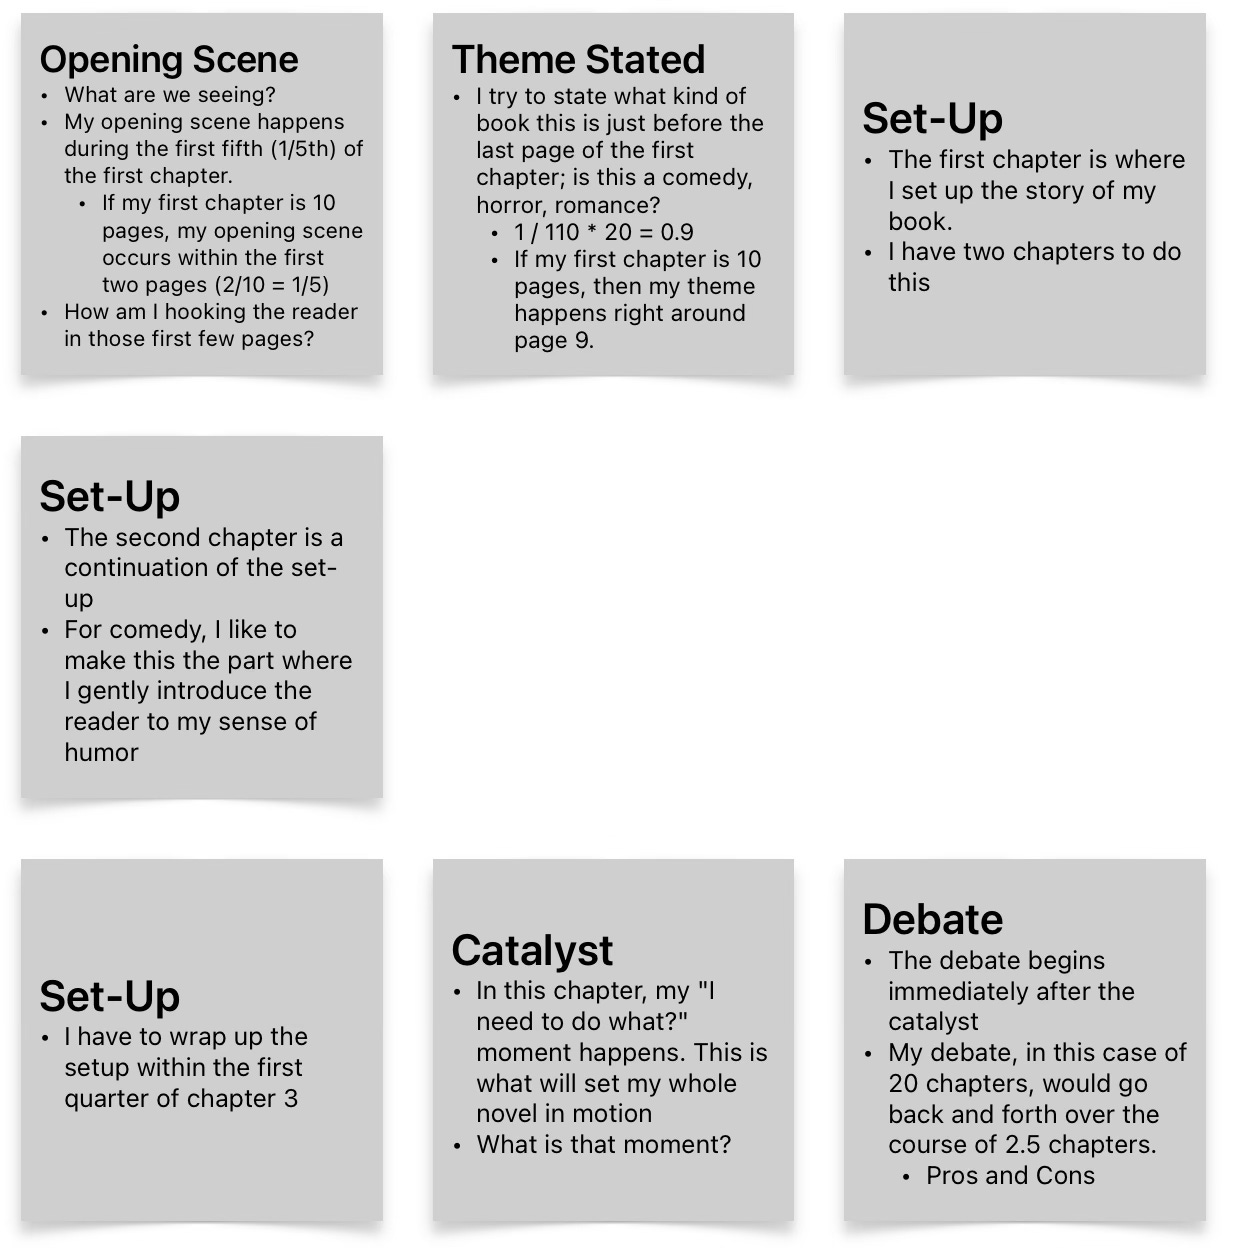
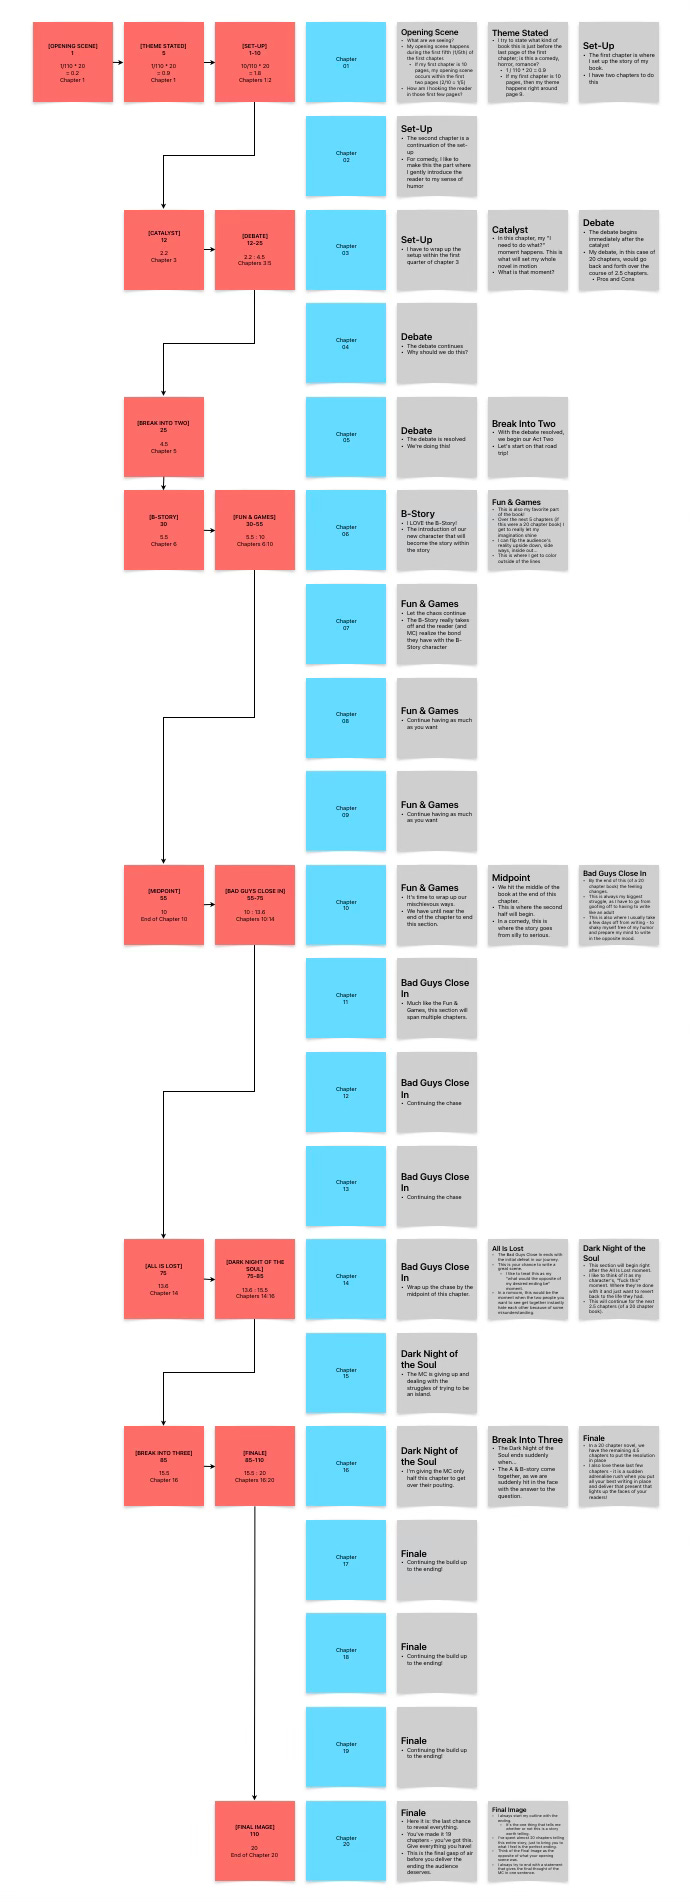
We have our character sticky notes and now I want to add my story structure elements, the red sticky notes. Earlier, I had mentioned that I felt I knew the formula to storytelling, only to read Save the Cat and realize the industry had already defined it. This might be the only boring part of my process, but I create a red sticky note for each of the fifteen elements that Blake Snyder coined. Beyond the name of the structure, I also list the point in time of the movie the industry recommends. For example, the Opening Scene in a movie occurs in the first minute of the movie. On the sticky note I will add, “Opening Scene” and below it, “1”. The same goes for the “Debate”, and “12-25”; meaning within a movie, the debate should begin at the 12th minute, and last until the 25th minute. These are NOT required, but merely a standard storytelling practice used by Hollywood. “But, Shaun, I’m writing a book, not a screenplay.” I know, I was right there with you and thinking the same thing. However, I tried this method in my own process and it made writing my next book so much easier, especially the editing process when I realized I had unknowingly worked through the story flow before ever writing the first chapter. It saved me so much time in the editing process.
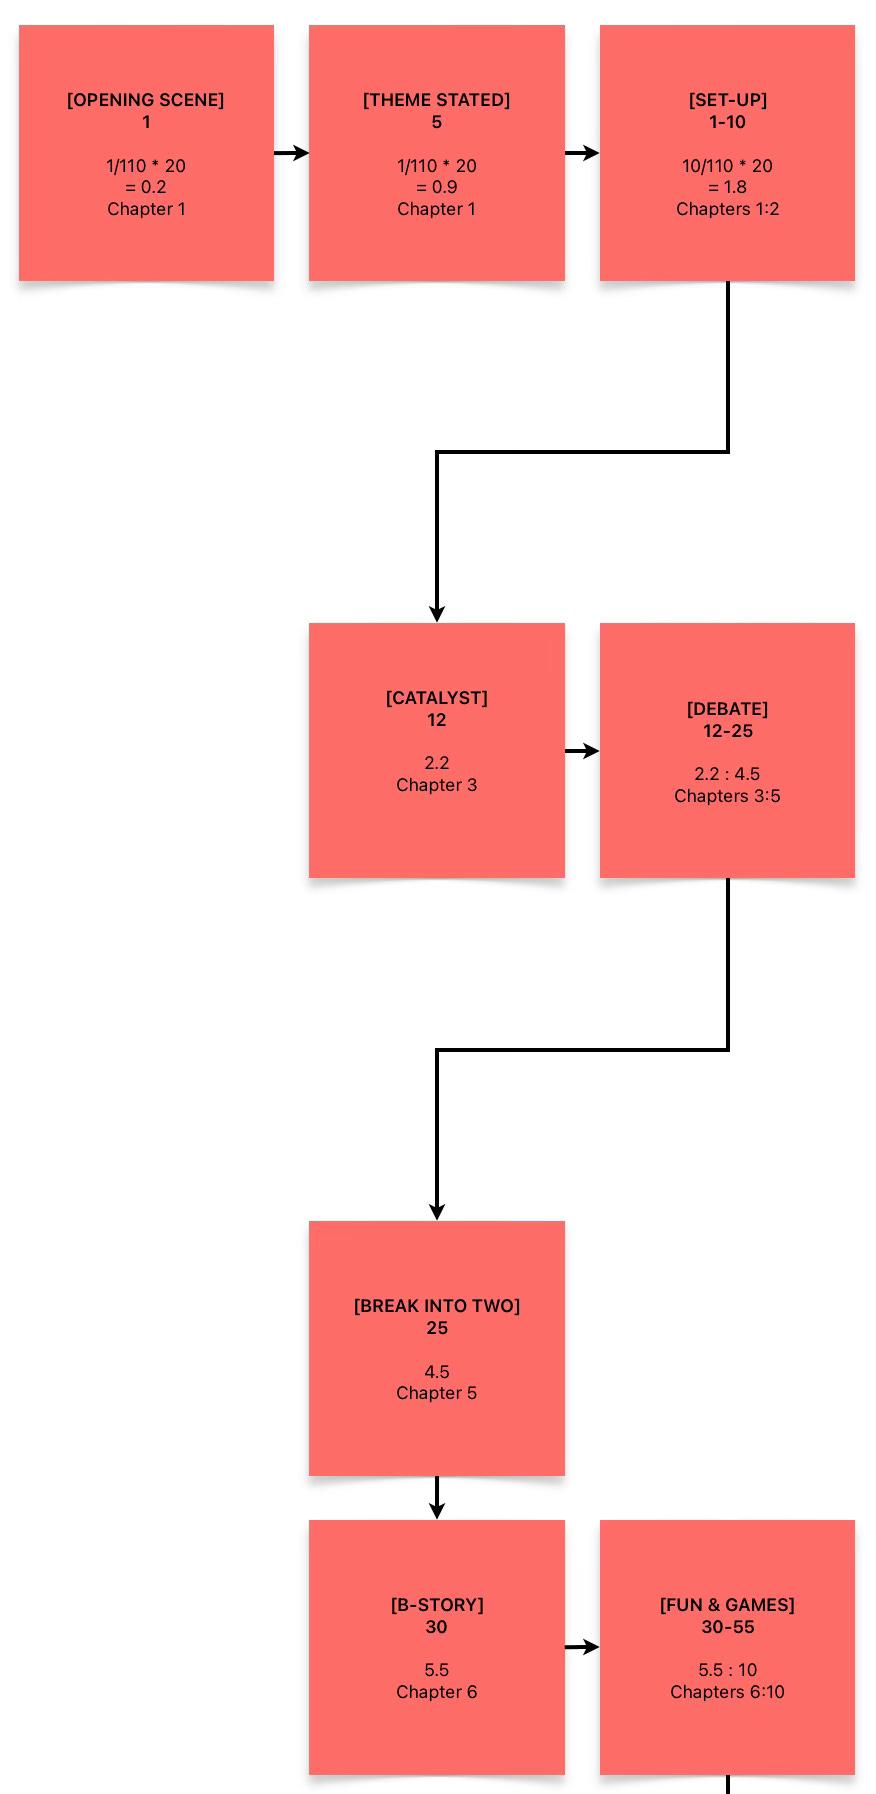
After adding the fifteen structure elements, I will create the blue chapter sticky notes. You might not know how many chapters you’ll need it, I don’t either. However, sometimes I start an idea with an exact number of chapters I want, because the number applies to the story. Take my first book, for example, where I had to incorporate twenty-four chapters into the story as they were integral to the plot. If I don’t know how many chapters I want or need, I create twenty. I do this because it allows me to assign the structure element notes.
This is the part where the analytical part of mind gets involved. Remember how I add the movie minute to the structure element note? This will come in handy when determining where each element should fall within the chapters. I start with twenty chapter notes for a reason - the math is easier. In a twenty chapter book, the first chapter will receive three elements: Opening Scene, Theme Stated, and the Set-Up. How do I know this? The math tells me.
Opening Scene [1]: No math necessary, that automatically falls in the first chapter.
Theme Stated [5]: Here’s the math, 5 / the standard number of minutes in a movie * the number of chapters in my novel —> 5/110*20 = 0.9. When looking this, chapter one equals 0 to 1. Because my value was 0.9, it falls within the first chapter.
Set-Up [1-10]: When an element spans more than one moment, I do the math for the starting and ending time. We already know that 1 (1/110*20 = 0.2) falls in the chapter, but what about 10? Let’s do the math. 10 / 110 * 20 =1.8. You might initially glance at that say it’s chapter one. Yes and no. Chapter one will be a value of 0 to 1, chapter two is a value greater than 1, and equal to 2. Essentially a value of 1.01 to 2.0 would be chapter two. In this case, our value was 0.2 to 1.8, meaning the Set-Up will span two chapters, and it will end roughly 4/5th through chapter 2.
One more example, the Debate [12-25]. Shall we do the math for this too? 12 / 110 (minutes in a movie) * 20 (our chapter count) = 2.2. And for the end of the debate (25), 25 / 110 * 20 = 4.5. We know that our debate, based on a twenty-chapter book, will begin in chapter two (2.2) and end midway through chapter five (4.5).
You’re Insane, Shaun
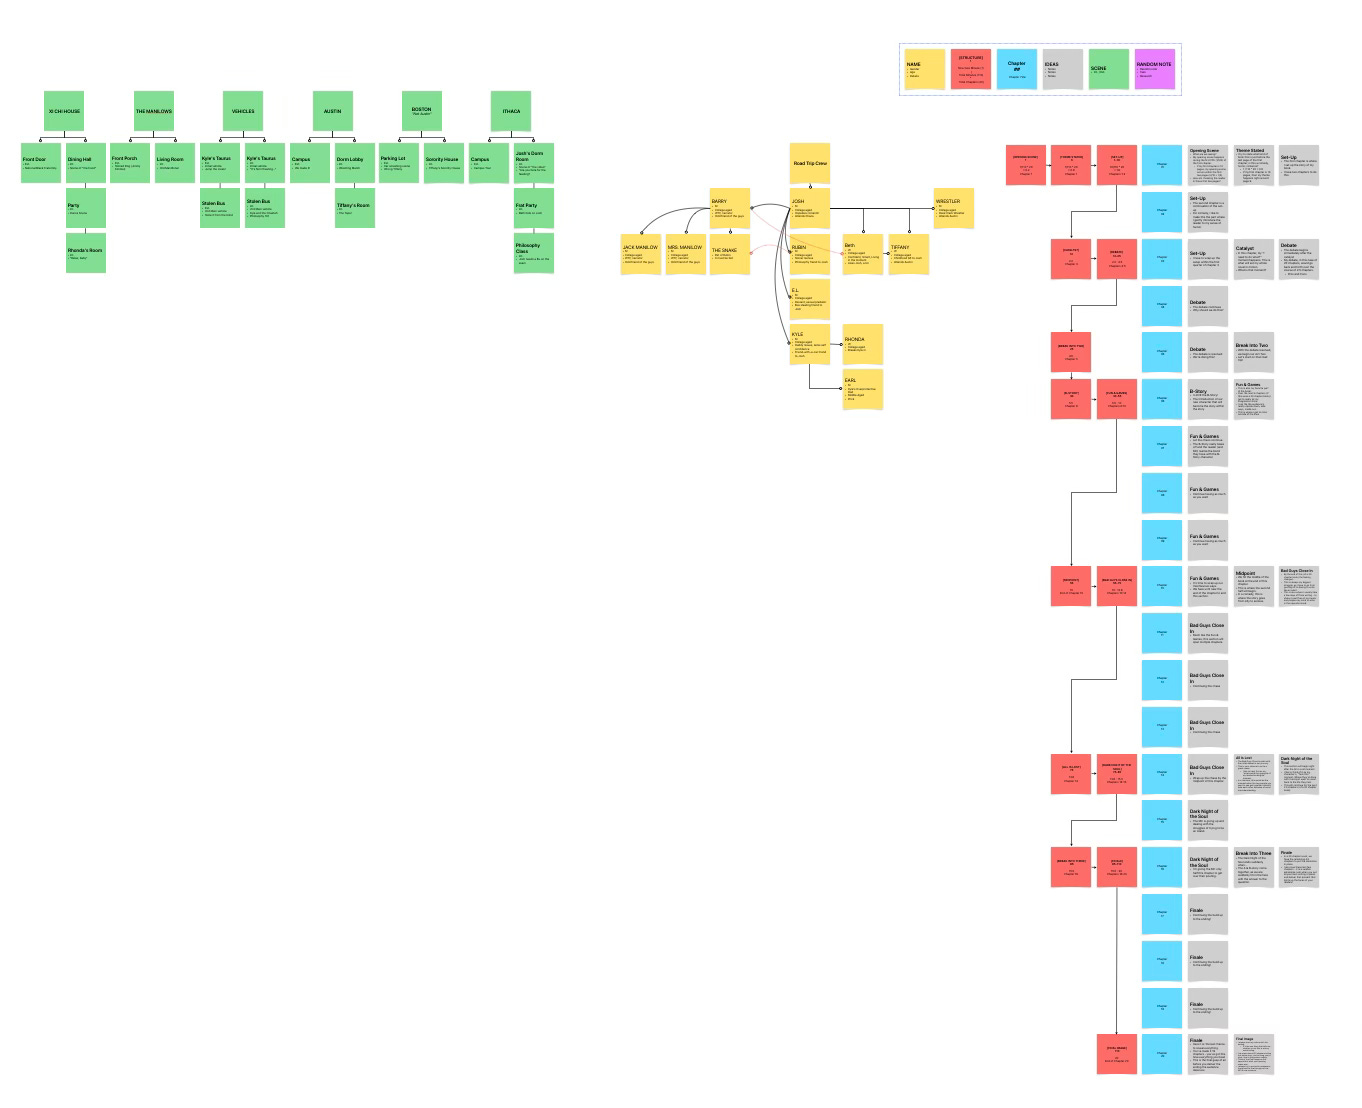
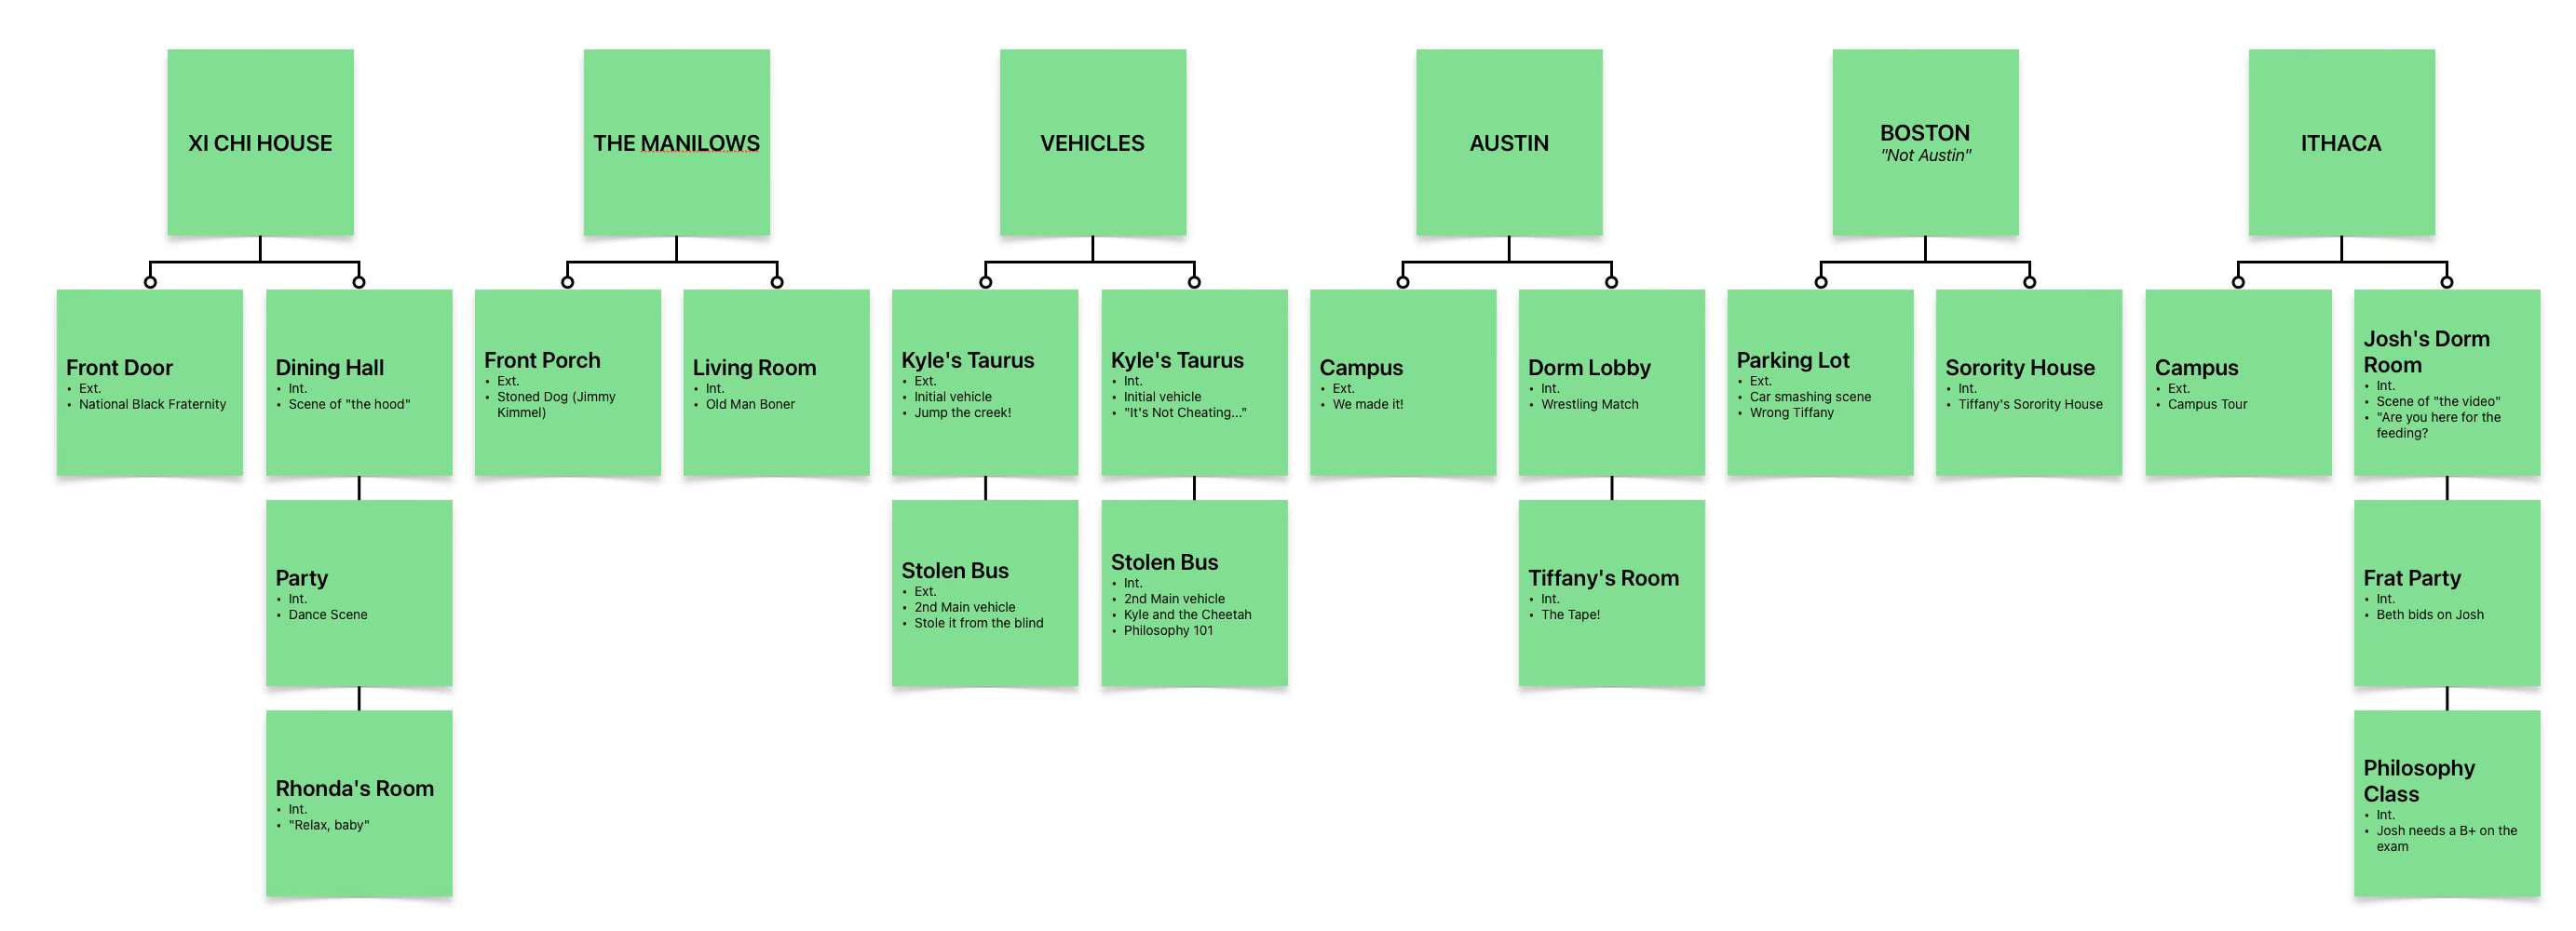
Maybe. It’s just how my mind works. Trust me, that’s the hardest thing we have to do during my outline process. I need to add one more thing, and I can do this now, or wait until I add more ideas to the chapters. I don’t consider this a necessity, but it makes it easier for me to remember parts of my story and not have to reread chapters to remember one tiny little detail that I have forgotten. This is the point when I add the green sticky notes for scenes. Maybe this is the screenwriting part of me, but I’ve incorporated it into my novels and has helped a lot. As I know what scenes are in the story, I create a top level green sticky note for the general scene, but then I create two columns of sticky notes below it: one for exterior, and the other for interior scenes.
As an example, I’ll use the 2000 movie, Road Trip. The movie begins with a campus tour at the University of Ithaca. A montage of old film follows this, but then drops us right into the dorms on campus, where Josh is moving in. My top level sticky note is “ITHACA”, and below that I have two columns: on the left are my exterior scenes and interior scenes on the right. Here, on the left I have a note for “Campus”, and on the right is “Josh’s Dorm Room.” As I mentioned, this is not required, but I have found that it has helped me visualize and capture my scenes.
And Back to the Fun
You’ve done all the hard work. It’s time to have fun! I add more gray stick notes (ideas) and align them with the chapter sticky notes. I know that, based on a twenty-chapter novel, I need to break into Act Three in chapter sixteen, and with that, my finale, which will span chapters 16 to 20. It is during this time when there are no bad ideas. Add as many ideas as you want. Rearrange them, push them off to the side, expand on one idea that really works. As you add more ideas and place them on chapters, you will see what does and doesn’t work. Do you really want to introduce the person your main character will fall for in the All Is Lost element? You could, it’s your story. Or would you kill off your villain before you reach the third act? Again, you could, but readers and audiences have become trained to expect that to happen near the end. Who knows though, maybe you’re writing a seven-act story. If this were the case, you would need to tweak this process.
The entire writing process is fun for me. I love coming up with the ideas and expanding on them. I love laying out my process and seeing my story come together. I love finishing the mind-map outline and being able to see the visualization of my story. I love taking that structured mind-map outline and opening my tool of choice for writing, only to go further in depth on the chapter outlines. Lastly, I love sitting down, going through my writing routine, and adding the words to fill in the story on the blank page.